Showing posts with label Recipes. Show all posts

Tuesday, August 13, 2013

Tomato Season...My Favorite Chili Sauce!

It's Tomato Season!
Cutest tomato label ever!
 
Have you ever noticed that when you plant tomatoes that there is either too few...or too many?  I have the sinking feeling that this is the year of "too many."  The weather has been perfect for tomatoes...hot and sunny.  Now the plants are full of quickly ripening tomatoes...and I am not exactly in the mood to spend days huddled over a steaming canner.  Lucky for me, my husband George loves the "scientific process" of canning.  He'll do all the peeling and chopping...which I hate...and I will prepare the bottles and get the water bath canner steaming.  Fair trade I think!  Last weekend we made the raspberry jalapeno jelly I posted about here.  It was a great success and I now have enough to last for at least a year.

 Of Course I Can!
She looks a tad shell-shocked if you ask me...lol!
 
Homemade Chili Sauce...
Yummy...better than store-bought!
 
George's Chili Sauce Recipe
Yield:  about six pint jars.
4 quarts peeled, cored, chopped tomatoes ( about 24 large)
2 cups chopped onions
2 cups chopped sweet red peppers (about 4 medium)
1 hot red pepper (we use the dried pepper flakes)
1 cup sugar
3 Tablespoons salt
3 Tablespoons mixed pickling spices
1 Tablespoon celery seed
1 Tablespoon mustard seed
2 1/2 cups vinegar
 
Combine tomatoes, onions, peppers, sugar and salt.  Simmer 45 minutes.  Tie spices in a cheesecloth bag; add to tomato mixture; cook until very thick, about 45 minutes, stirring frequently
 
Prepare home canning jars and lids according to manufacturers instructions.
 
Add vinegar to tomato mixture; cook to desired thickness. Remove spice bag.  Carefully pour hot sauce into hot jars, leaving 1/4 inch  head space.  Adjust caps.
 
Process 15 minutes in boiling water bath canner. 
 
 
Pretty...as well as delicious!
Use for crockpot meatballs...serve over rice!

Better than Manwich for sloppy joes...a favorite Halloween supper treat!
 
Random Acts of  Fall Crafting...
Repurposed bird cage.
Burlap and Sunflowers.
 
Dear little owl...
I love sunflowers this time of year...a preview to Fall.
Owls and crows show up in August around my house.
 
Happy Pre-Fall, Y'all!
 
Bonus!!!!
Tomato Labels...enjoy!


Thursday, August 1, 2013

August is Here...Let's make Raspberry Jalapeno Jelly!


August is Raspberry Month...
At least it is on my calendar...it is also sunflower month, but that's another story.  I am so looking forward to Fall.  It's been a long hot summer.  I glad I'm not the only one who hasn't posted as often...it has to be the heat...and the busy-ness of summer vacations.  I am an Autumn Woman...not only in the seasons of my life, but in my love of the golden waning of the year.  This week I have been taking down the red, white and blue in my home and replacing it with the reds of apples and the golds of sunflowers.  I am also getting ready for the tons of tomatoes that will soon be ready for canning.   Our garden is pretty limited this year...my husband's company has been busy with a complicated job that requires more of his attention than usual.  Tomatoes and Peppers...that's it!  We had planted green beans, but they didn't come up.  Which is okay by me...canning beans can be very tedious.  I'd rather do crafts!  Who's with me? 


Raspberry Jalapeno Jelly
 
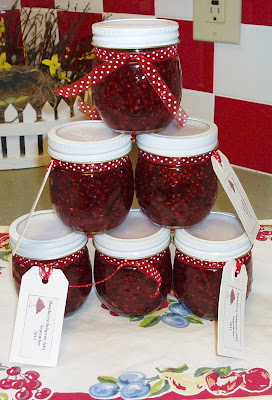
Technically...it's a jam...but "jam" doesn't flow off the tongue like "jelly." A few years ago, after spending more than $6 for a small jar of raspberry jalapeno jelly at a craft boutique...and loving it...we decided to make our own.  After all, it should cost less than $36 to make six half-pints of sweet and spicy goodness.   This recipe quickly became a family favorite.  We use it on taquitos (flautas), pork chops, and with turkey...instead of cranberry sauce.  I love it with Swedish meatballs in place of the lingonberry jam they sell at Ikea.  You should try it on cornbread muffins...OMGoodness!
 

My first batch...2011.
 
I love how pretty the bright red jelly looks!  Since I was using Tattler Reusable Canning Jar Lids, from Tattler Reusable Canning Lids, I didn't want to write the contents on the top, so I made some little tags, just to make them extra fun.  We found a great recipe at Greens and Jeans.  The only change we made was to use 5 jalapenos intead of 2.

Greens and Jeans Raspberry Pepper Jam
Makes 6 half-pint jars
Ingredients:
5 cups fresh raspberries
2 jalapeno peppers, (we used 5, 2 with seeds)
1 red or green bell pepper
4 cups sugar
1/2 cup apple cider vinegar
1 package powdered pectin.

Directions:
Wash and pick through raspberries.  Crush berries and place in a large pot.  Chop the bell peppers and jalapenos (wear gloves!)  Add the chopped peppers to the pot along with the sugar and vinegar.

Cook the mixture over medium heat, stirring often until the sugar dissolves. Simmer for 15 minutes.  At this point, stir in the pectin.  Bring to a rolling boil and boil for 1 to 2 minutes.  Ladel into hot half-pint jars and process in boiling water canner for 10 minutes. 
 
That's it...short and sweet as a ripe raspberry!
More fun will follow as the days grow cooler.


Wednesday, September 19, 2012

Stingy Jack...the story of Jack o' Lanterns!

Punkin Love...
What is it about the sight of plump pumpkins in an autumn garden that so gladdens the heart?  At summer's end I crave the golds and oranges...the changing colors.  The sky seems bluer and the light of the sun slants golden across the face of the mountains.  In the farmers markets, bins and tables are piled high with pumpkins of every shape and size.

This morning the air was a bit crisper and I got the sudden craving for my mother's pumpkin chocolate chip cookies.  Pumpkin recipes are all over Pinterest...fancy cheesecakes and even Pumpkin Snickerdoodles!  In my sentimental heart, nothing could ever take the place of Mom's cookies.  I shared the recipe last fall when my blog was new.  Stay tuned...you'll find here again it after the story of "Stingy Jack."

Stingy Jack...
Halloween originated in the Celtic lands of Ireland and Scotland.
 
The phrase "Jack o' lantern" was first used to describe a mysterious light seen flickering over the marshes at night.  When approached...it always seems to be just out of reach.  The phenomenon is also known as "will o' the wisp."
 
I had always heard that many of our Halloween customs originated in Ireland...especially that of the Jack o' lantern.  So I thought I would find out a little of the history of our pumpkin friend.  I found the legend on Stingy Jack on many websites, but the story on History.com was a little more complete.  The following info is taken from the site...

Vintage Postcard...Scottish?
The Legend of "Stingy Jack"
People have been making jack-o'-lanterns at Halloween for centuries. The practice originated from an Irish myth about a man nicknamed "Stingy Jack." According to the story, Stingy Jack invited the Devil to have a drink with him. True to his name, Stingy Jack didn't want to pay for his drink, so he convinced the Devil to turn himself into a coin that Jack could use to buy their drinks. Once the Devil did so, Jack decided to keep the money and put it into his pocket next to a silver cross, which prevented the Devil from changing back into his original form. Jack eventually freed the Devil, under the condition that he would not bother Jack for one year and that, should Jack die, he would not claim his soul. The next year, Jack again tricked the Devil into climbing into a tree to pick a piece of fruit. While he was up in the tree, Jack carved a sign of the cross into the tree's bark so that the Devil could not come down until the Devil promised Jack not to bother him for ten more years.

Soon after, Jack died. As the legend goes, God would not allow such an unsavory figure into heaven. The Devil, upset by the trick Jack had played on him and keeping his word not to claim his soul, would not allow Jack into hell. He sent Jack off into the dark night with only a burning coal to light his way. Jack put the coal into a carved-out turnip and has been roaming the Earth with ever since. The Irish began to refer to this ghostly figure as "Jack of the Lantern," and then, simply "Jack O'Lantern." 
A traditional Irish turnip jack-o'-lantern from the early 20th century. Scary, isn't it?
From the Museum of Country Life, Ireland.
 
From the legend of Stingy Jack came the Irish tradition of placing Jack- o'- lanterns made of turnips and other vegetables in windows or by doors on Halloween.  The Jack-o'-lanterns are meant to scare away Stingy Jack and all the other spirits that are said to walk the earth on that night.  It wasn't until the tradition was brought to the United States by immigrants that pumpkins were used to make them.  I read a comment on a blog from Scottish reader who said that until a few years ago, pumpkins weren't as readily available as they are here.  He said that many people still carve faces into turnips on Halloween.  He admits that pumpkins are much easier to carve!

Modern Turnip Jack o' lantern.
 
Well...that's the story of Jack o'lantern.  I had never heard the story of Stingy Jack.  I have always loved Halloween but never took the time to learn more about it.  There is a lot more information about the Celtic celebration of "Samhain."  It might be fun to do a little more research...after I make my cookies of course!
 
This is the prettiest pumpkin...makes me want to bake!

Mom's Pumpkin Chocolate Chip Cookies...recipe makes a lot!


Mom's Cookie Recipe

Ingredients:

1 Cup Butter or Margarine
3 Cups Sugar
2 Eggs
1 16 oz. Can Pumpkin
2 Tsp. Vanilla
2 Tsp. Cinnamon
2 Tsp. Nutmeg
5 Cups Flour
2 Tsp. Soda
1 Tsp. Salt
2 Tsp. Baking Powder
Nuts and Chocolate Chips (As many as pleases you!)

Bake at 375 degrees for 12 minutes. Makes about 6 dozen.  If you freeze some...you might be able to enjoy them throughout the fall season.  Take some leaf-peeping! 

 
P.S. I found some fun fall baking images to keep to the pumpkin theme...enjoy!


Happy Fall...Y'all!


Thursday, May 24, 2012

Preserving Family Traditions...Grandma's Cookies!

Their Signature Cookies...
When I think about my two grandmothers, I remember what they taught me, how much they loved me...and cookies!  Grandma Zetta and Grandma Patta each had a cookie recipe that was her "signature" cookie.  What is your cookie?  What will your grandchildren remember about you?  Mine will probably see a bag of "Golden Oreos," and think of me fondly.  What they won't realize is that I switched to Golden Oreos when I became too lazy to brush my teeth after eating the classic chocolate ones.

This week I located the recipes (or a reasonable facsimile) for my grandmothers' cookies.  I baked them, photographed them for posterity...and now I wish to share them with you.

Zetta's Cookies...
My first memories of eating at Grandma Zetta's house are confusing.  I know that it was the late 50s or early 60s, so why did it feel like I had gone back to Ma Ingall's kitchen?  In those days, Grandma Zetta still used a coal stove to cook with and heat water.  My father says Grandma was a good cook, but I remember that most of her rolls were burned on the bottom when she took them out of the old iron stove.  Remember Sunday chicken dinners at Grandma's?  I sure do.  Just as Mom and Dad were loading us into the car to drive to Alpine, the phone would ring.  It was Grandma.  "Tad, since you're coming up, could you stop at the KFC and pick up a bucket of chicken?"

Grandma Zetta was a practical woman...the queen of the "use it up, make it do" club.  Life during the Great Depression taught her to be frugal.  When I slept over, our meals would feature left-overs from the day before...and the day before that.  When Grandma and Grandpa got tired of the carrot and jell-o salad...did she throw it out?  No, ma'am!  She gave it to us.  "Rhea, I brought over some carrot and jell-o salad...it gave Mel gas.  Do you think your kids will eat it?"  Bless her heart...she meant well...but we seldom got to sample her cooking on the first go-round.  It wouldn't have been so bad, but she did it with her cookies as well.

Chocolate Walnut Cookies...
Grandma Zetta's chocolate walnut cookies were two of my favorite food-groups...chocolate and walnuts.  Once in a very great while we went to visit her on the day the cookies came out of the oven...electric by now...and I was in heaven!  The little brown bear by the plate was found in Zetta's cupboard...there is a matching sugar and creamer.

The Recipe
(makes 2 dozen depending on how much dough you consume...)
  • 1 1/3 cups all-purpose flour
  • 2/3 cup unsweetened cocoa powder
  • 1/2 teaspoon salt
  • 3/4 teaspoon baking soda
  • 3/4 cups unsalted butter. (mine was salted so I omitted adding salt)
  • 1 1/4 cups packed light brown sugar
  • 2 large eggs
  • 1 cup walnuts coarsely chopped.
Preheat oven to 370 degrees F. Line cookie sheets with parchment, or leave ungreased.

Beat together butter and brown sugar until fluffy.  Add eggs one at a time, beating until well-combined.  Add dry ingredients, stirring until just combined, then add the walnuts.  Will be thick and chocolatey like brownies.

Using a cookie scoop or a heaping tablespoon, make sure there is at least 2" space between the cookies on the sheet.  Bake on center rack until puffed, but still shiny...10 to 11 minutes.  No longer...I burned the second batch.  Frost when cool with your favorite chocolate frosting and sprinkle with walnuts.  Feed them to your grandchildren sometime in the first week after baking...but they won't last the first day.

Patta's Cookies...
When I wrote about Grandma Patta at Christmas, I mentioned that I truly believed that she was Santa's Helper.  One of the reasons was that she always smelled like gingerbread.  Patta's specialty was gingerbread cake and molasses cookies.  I wish I could say that Grandma Patta was a brilliant cook...but alas!  I would often spend a week at a time with her and I can honestly say that she knew how to cook less than a dozen different items.  For lunch we would get the TV trays out and watch "The Price is Right" while dipping toast triangles into eggs sunnyside up!  Loved it!  For snacks she made me tomato slices dusted with sugar.

She wasn't much of cook, but I loved her and anything she made for me.  She kept her cake and cookies in the refrigerator...so I always preferred my gingerbread cold...it's cold at the North Pole, right?

Grandma Patta was a doll collector.  She had a special room filled with cabinets displaying her dolls.  The little girl on the right is from her collection.  She made all the clothes for her dolls and many for her granddaughters' dolls.
A few years ago I found this recipe and made copies for all my sisters.  I lost it soon after, but by some miracle...and a lot of digging...I was able to find it again.  I like to believe that my dear Grandmothers are smiling down at me and are pleased with their granddaughter's somewhat awkward attempts to share her memories of them.  Speaking of granddaughters...

Madisons Gift...
A Mother's Day giftie from my sweet 14 year-old Madison.
She knows how much I love red and white mushrooms...so she made this little dish in ceramics class.
Could it be any cuter?

Thursday, September 29, 2011

Fall Family Traditions...Comfort Food!

 Autumn Soup
Some of my favorite memories of Fall are of hurrying home from school on a blustery day and finding Mom hard at work making pumpkin cookies or cinnamon rolls.  While dessert was getting ready for the oven, a pot of soup or chili would be bubbling on the stove.  I'm noticing that many of my favorite memories involve food.  But isn't that how we as mothers show how much we love our families?  A neighbor of mine doesn't do crafts, but boy can she cook!  She shows her love and friendship with gifts of cookies and other yummy treats.  She would deny it is a talent, but I always wish I were more like her.


Recipe for Autumn Soup 
This is simple fare...no frills...but filling.
Ingredients:
1 lb. Lean Ground Beef
1 Chopped Onion
Carrots ( I used a small bag of baby carrots--12 oz. or so)
3 Stalks of Celery, Chopped
6 to 8 Russet Potatoes, Peeled and Cubed
2 Cans of Beef Broth ( or equivalent Bouillon and Water)
1 Envelope Onion Soup Mix

Brown the ground beef, onion and celery together in a large stew pot.  Add potatoes and carrots.  Season with seasoning salt and pepper.  Add more bouillon or broth to taste if needed.  I didn't have any celery, so I dumped in a jar of the green beans I bottled last month.  We like to eat the soup with corn bread.

Rhea's Pumpkin Chocolate Chip Cookies
I was feeling nostalgic, so I made both the Autumn Soup and the Pumpkin Chocolate Chip Cookies for supper last night.  I'd forgotten just how much I missed my parents and five brothers and sisters and our family life.  Fall is a season of reflection...of looking back, so we don't forget where we came from.  This cookie recipe is pretty good...I think...and it makes a LOT!.


Mom's Cookie Recipe
Ingredients:
1 Cup Butter or Margerine
3 Cups Sugar
2 Eggs
1 16 oz. Can Pumpkin
2 Tsp. Vanilla
2 Tsp. Cinnamon
2 Tsp. Nutmeg
5 Cups Flour
2 Tsp. Soda
1 Tsp. Salt
2 Tsp. Baking Powder
Nuts and Chocolate Chips  (As many as pleases you!)
Bake at 375 degrees for 12 minutes.  Makes about 6 dozen.

What Makes a Comfort Food?
 I wonder why so many of our childhood memories seem to have food attached to them?  Good times and good eats go together hand in hand...like Trick or Treat and Sloppy Joes.  Autumn garden harvests bring corn on the cobb and toasted bacon and tomato sandwiches.  One of my favorite garden comfort foods is stuffed green peppers.  We had a bumper crop of peppers this year, so I have been making this dish at least once a week.
My Stuffed Green Peppers Do Not Look This Pretty!

My happiest memory of Stuffed Peppers comes from early in my marriage.  I was feeling lonely.  My husband had a part-time job loading trucks after classes at BYU...working nights.  When the baby went to sleep, I had no one to talk to.  Just when I was feeling the most sorry for myself, my mother came to the door with a plate of Stuffed Green Peppers swimming in tomato juice.  She said she couldn't stay, but she had felt that I needed a little something.  Nothing ever tasted so good!  "Comfort Food"...says it all!

Bless Your Family with Love and Comfort Food.

Have a Vintage Autumn!


Wednesday, September 28, 2011

Powdered Milk...The Sequel!

I CONFESS...I'VE DONE THIS TOPIC BEFORE!
If you are on my Provident Living Newsletter list, just pretend you've never seen this.  I just knew that if I didn’t find some new and interesting ways to use my powdered milk storage, it would just sit on the shelf gathering dust and losing nutrients.  So I decided to learn how to make my own yogurt.  The best instructions that I came across are in the cute little handbook called “The Family Storehouse” put out by Highland Stake. 

INSTANT OR NON-INSTANT
What could be simpler, I wondered, than a recipe with only three ingredients:  water, powdered milk, and a small container of plain yogurt?  I decided to try it out and…only if I liked it…pass it on to you.  The recipe specified non-instant nonfat milk, not whey-based varieties such as Morning Moos.   I only had instant in my storage, so I went all over trying to find the non-instant.  I finally tracked some down at the “hippie-organic-wheatgrass store” in American Fork and set to work.  The finished product was creamy and yummy, especially with strawberry fruit preserves stirred in.  I was pleased with the result, but didn’t feel I’d saved any money because I had to pay $10 for the milk and almost $3 for the Greek yogurt I used because of its live cultures and higher protein content. 
For my second attempt, I used instant milk, only I doubled the amount called for in the recipe.  And it came to pass (lol) that it worked out even better.   So go ahead and substitute the instant if that’s what you have…but not Morning Moos.  For those who don’t have “The Family Storehouse,” the recipe is as follows:
YOGURT RECIPE—(makes 4 pints—can be doubled for quarts)
2 ¼ cups warm water
2 cups dry powdered milk (or 4 cups instant)
4 ½ cups cold tap water
2/3 cup plain yogurt (no gelatin) this is your start—you will use your own home-made yogurt hereafter.
Mix dry milk and warm water in blender or mixer.  Pour into kettle, foam and all.  Slowly heat to 180 degrees, stirring often to prevent scorching.  Remove from heat and pour into a large bowl containing the cold water, bringing temperature down to below 110.  Spoon off foam and mix in the yogurt start. 
Pour into jars. (I used ½ pint jam jars because they are cute)  Place filled (uncovered) jars in warm oven that has been preheated to about 170 degrees.  Turn off oven, but leave oven light on, it will keep the oven warm.  You can use the “proofing” function or a warming drawer if desired.  Do not allow jars to be jiggled or moved.  It should set up in 8-12 hours, so leaving it overnight to set would be ideal.  When set, put lids on jars and put in the refrigerator.  Keep 6-8 ounces to start your next batch.
VARIATIONS:
You can pre-flavor your yogurt by mixing in 2 ½ T of dry Jell-o and 2 T of sugar into 2 cups of the mixture before pouring it into the jars.  I made one pint of vanilla yogurt by mixing in 3 T sugar and ½ tsp. Vanilla.  Be sure to keep enough plain yogurt for your start.
Hope you have fun trying this easy recipe.  It will make you feel all provident and virtuous. =D If you can figure out a way to get it into Gogurt tubes let me know.
Don't you miss the early-morning rattle of milk bottles being left on your porch?